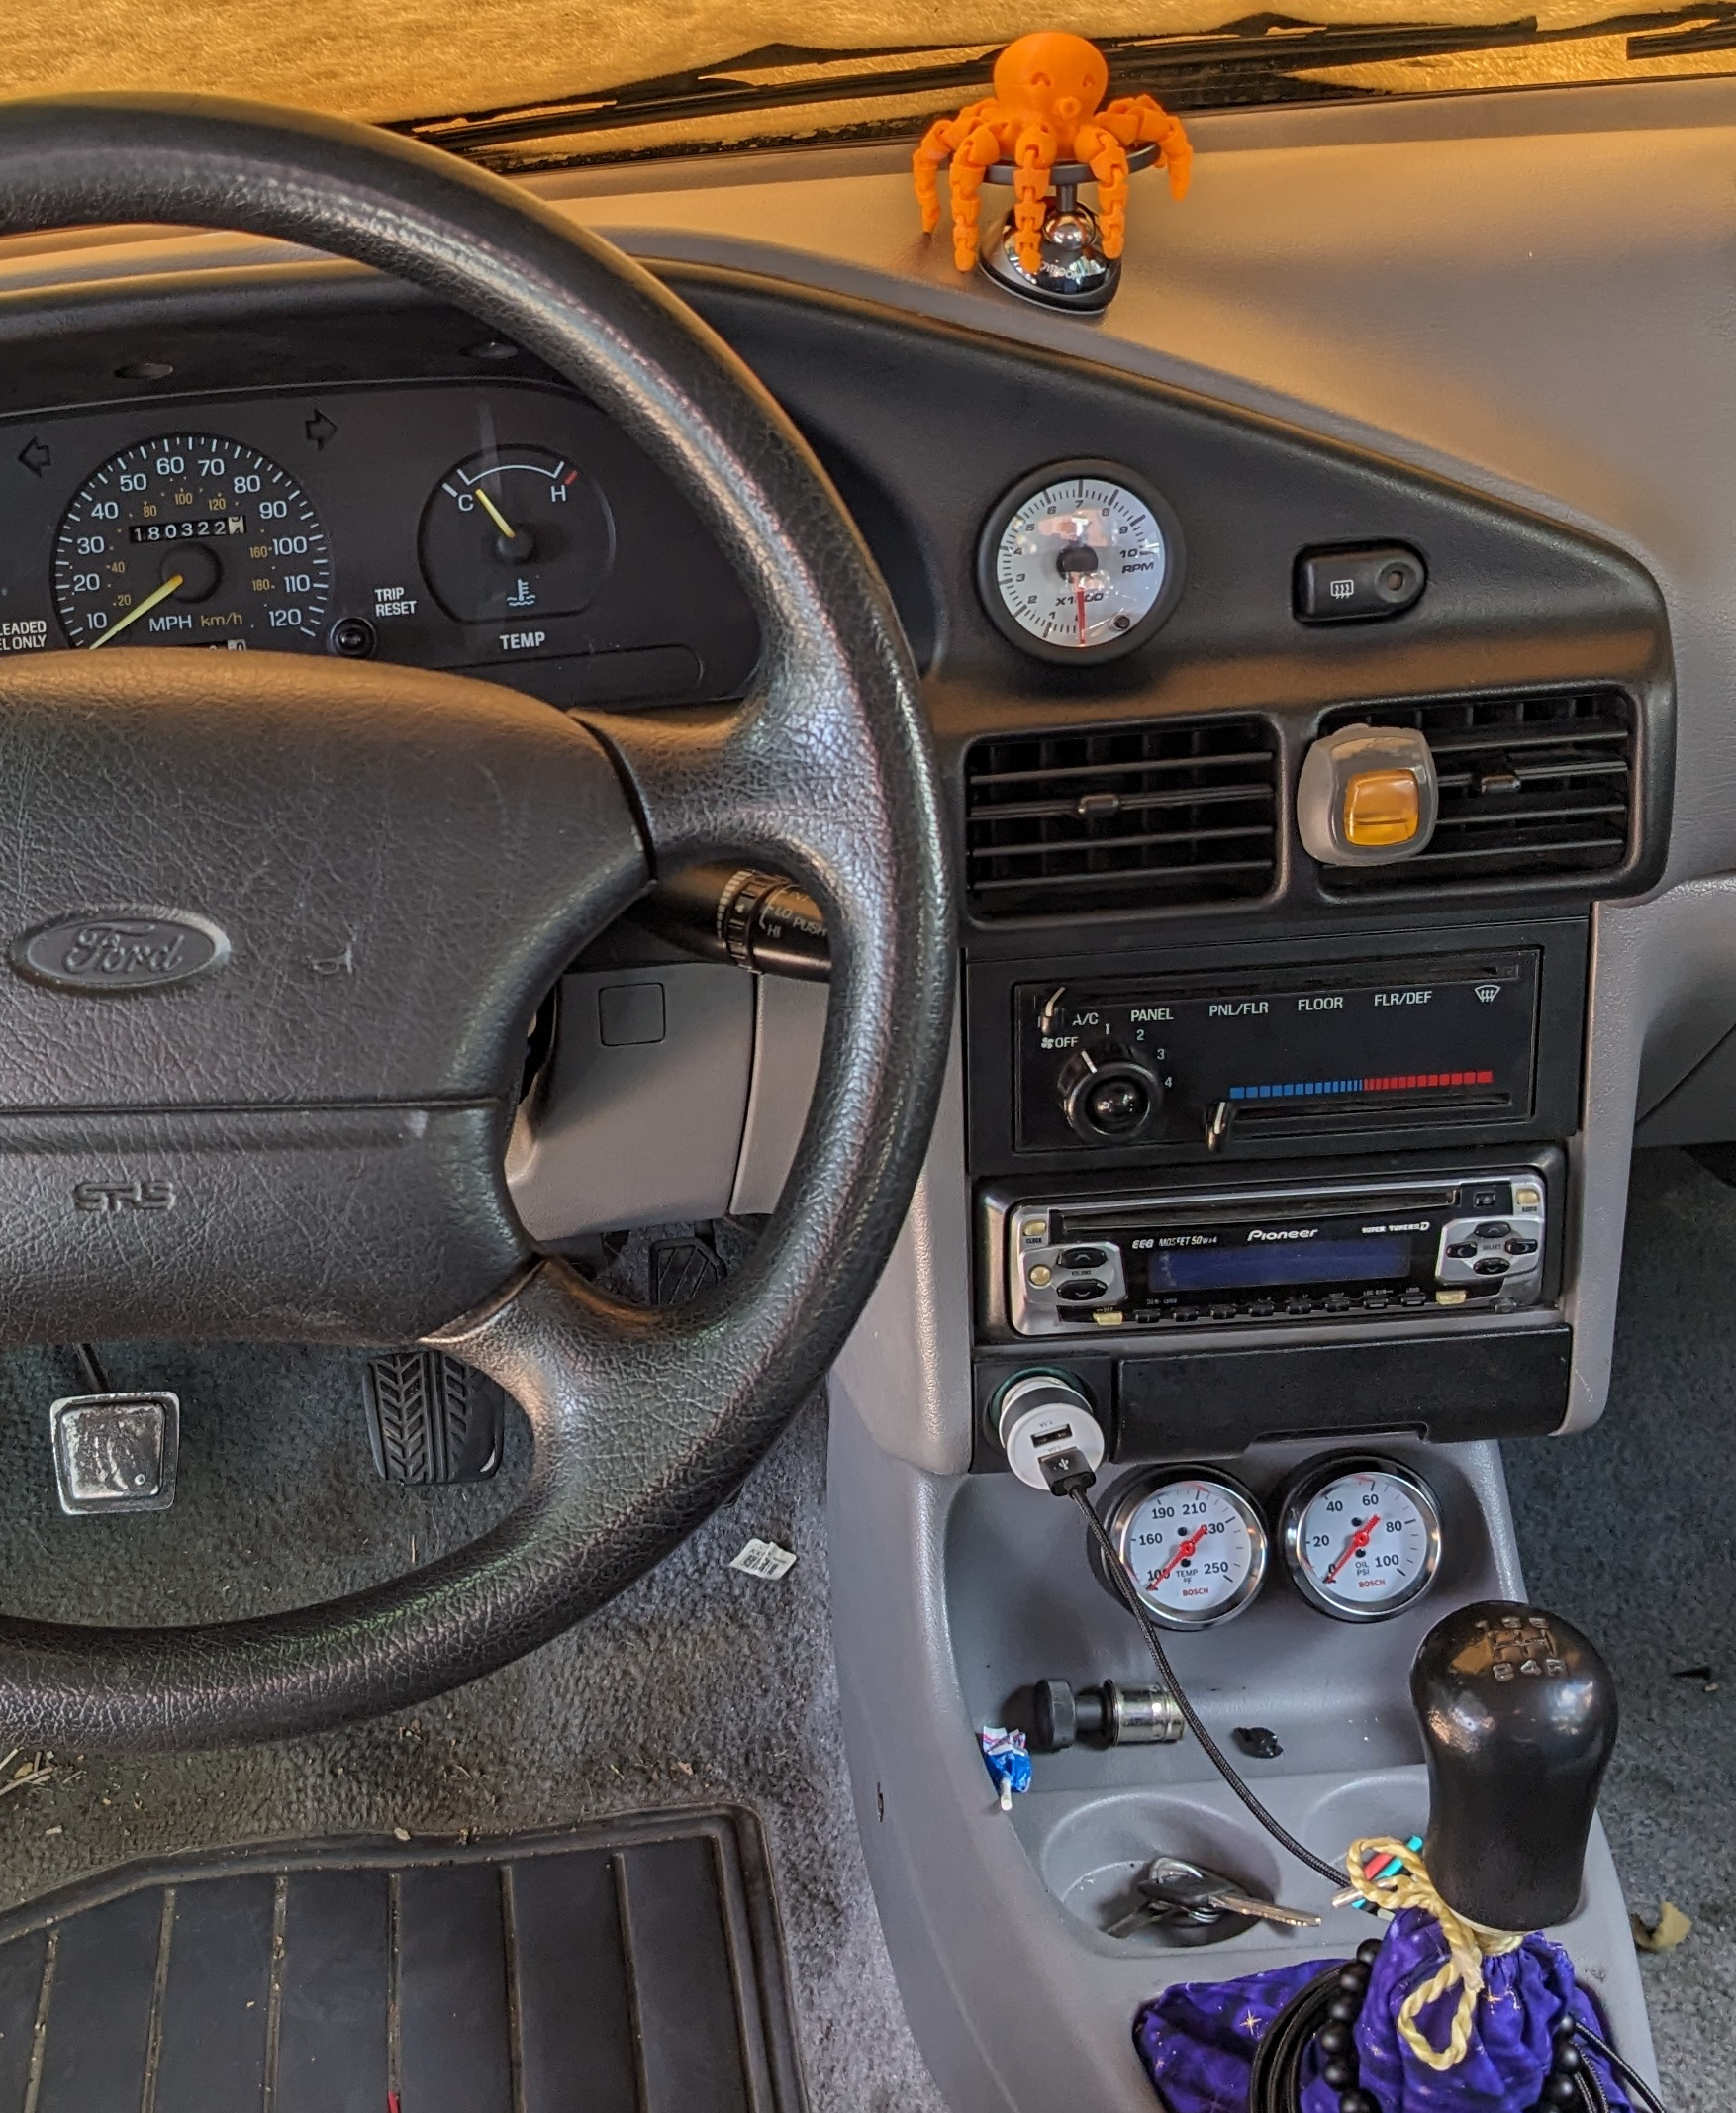
Indy’s new ride (to him) is a 180K mile 1995 Ford Escort LX Wagon. Very nice shape, almost all of it is original, untouched, and clean. It has a Manual Transmission, Heat and A/C, Power Steering, Power Brakes, Air Bags, Automatic Seat Belts, Aftermarket Pioneer CD Player (Looks circa 2005’ish?), manual Windows, and minimal gauges. It just has fuel level, speedometer, temperature (kind of), and a pile of dummy lights along the bottom of his dash (Oil light, Low Antifreeze Light, Brake Light, Rear Hatch Light, Shift up light, Seatbelt light and I think I saw an Airbag light).
When you have a car that is starting to get up in age (I don’t call a car old till it’s 35-40 years old or more) you need a little more detail about what the engine is going through. A simple C-H temperature gauge isn’t going to cut it. An oil light isn’t enough to know if you’re engine is just running low pressure, if it has no pressure (engines loose oil pressure with age, so low oil pressure may just be due to the high mileage and looser main bearings – where oil pressure is usually built). Even though his is has the man’s transmission (manual), it did not come with a tachometer, just an “up arrow” to tell you to grab the next hear up the line (I drive it according to the up arrow, and it’s insanely slow – I assume it was telling my to grab the next gear around 1500 RPM – I was doing 35 and it was telling me to shift to 5th). So we also put a tachometer in there for him so he “knows” how busy the hamsters are inside the engine.
I forgot to get busy taking pictures until we were in the cleaning part of the process. Before we pulled the internal guts out of the dash, I ordered a Ford Shop Manual, and the Ford Vacuum and Electronics Troubleshooting Manual. Both are used together to diagnose issues, and find out where the connections are for adding accessories or aftermarket bits and pieces (Hopefully he’ll add some “Whore Lights” when we get the necessary shit done.
For example, this is what “Whore Lights” look like: 
In our case, we first needed to get the signal from the engine’s computer’s spark instructions back inside to the the tachometer. We found a vacant place on the very crowded firewall to drill a small hole, install a protective rubber grommet, and run a solo wire to the computer on the fender well.
While I was pulling the driver’s side of the engine bay apart, I found a dead end vacuum line, some unconnected vacuum lines, and a few vacuum lines that were mere shells of their former selves. So we took my car to the O’Reili’s to get hose, and see about a gauge angle mount. With fresh hose in hand, I hooked them all up how they looked like they needed to go and we called it a night. Fortunately, my brain works full time, all the time, and I laid in bed running vacuum line routes over in my head and it just didn’t seem right. So in the morning, I re-ran them and the car still ran better, so I guessed I did them right. Turns out when the books came, I was really close, and found that his car doesn’t match the book anyhow, but the process of what needed to be done was correct.
Even though this year Escort came with a tachometer on some models, the computer doesn’t come with the pin you need if it doesn’t have a tachometer in the dash. I pulled the connector apart, drilled out the vacant spot, soldered up a long end of wire, ran it in with a nice pretty covering then heat-shrinked it, Zip tied it all snug as a bug, and put the engine bay back together (I used my wire loom on the wire, so it looks like it was almost built to go there).
Back inside, Indy tore the center console out and pulled what he could off the dash (everything but the speedometer gauge cluster cuz .. hell no, it can’t be that easy). We drilled the holes for the bottom two gauges (Oil Pressure, and Water Temperature), then took a peek at what we’re going to have to “modify” to get the center console to sit back down. It looked like I was going to angle grind my brains out, but 4 screws later, and it was down like factory, and looked as stock as a bone (They’re not hooked up yet because, reasons). There is a PCM under the ashtray that is on a cross brace. I took the cross brace out, and put the PCM on the carpet (later we’ll Velcro it to the carpet so it doesn’t migrate.
While Indy was inside scrubbing his plastic dash parts clean, I went back out to see how to convince the gauge cluster to exit the vehicle peacefully. Turns out, it simply requires blood sacrifice, and some violence. The speedometer cable is a simple thing. A simple cable with guts that spin according to the transmissions exist shaft speed. To get the cable off, you simply pinch a plastic connector on either side, and it slips off. the cluster like it was built to come off. Engineers like to make it sound that easy don’t they (Sadistic assholes).
You have to lay down on the floor, butt hanging off the drivers seat out the door, lower back arched across the scuff plate and your ass about bent down to the ground, right arm shoved all up as high as it can be forced into the bowels of the dash with all the sharp things (you’re coming out bloody, just accept it), decades of dust into your lungs and eye holes), all the darkness (It is all by feel cuz you can’t see shit), and everything’s in the way. It was hot out, so the thing that was blocking 90% of the path was the duct for the vents. I got my hand into the tightest part of that area, made a fist, and the plastic gave way gracefully (IE: nothing broke). I got my fingers on the plastic of the speedometer “just” enough, and it slipped free. Indy had to get the spedo cable back on, my hands were too “pudgy”.
Inside we changed out the light bulbs in the dash for some purple ones (His theme is kind of a green and purple look). We left the typical things with the stock clear bulbs like the dummy lights, blinkers, and such. But any lights that handled the needles, and backlight, they got the purple touch (we thought).
Here’s the pictures of the cleaning up and swapping out of bulbs.


If you’re ever the participant in tearing the interior of a vehicle apart, please clean it to high heaven. While the parts were out and available, I loaded the sink with Dawn, warm water, and a few brushes. We pulled all the parts we could off, and washed all the things. Cleaned off the old dry rotted foam around the vents, repaired some broken screw tabs (with JB Weld), and tried to get into every little corner and crevice.


While things were drying off, we zipped off to the Lowe’s Depot, and snagged some new weather stripping (basically). It’s only $6 at Home Lowey’s, but it’s $20’ish at Auto Bone. We also didn’t get the foam weather stripping, we got the heat resistant rubber weather stripping, so it’ll last a bit longer, and won’t fall apart or collect dust like foam does.
Once we got everything re-wired and a simple functional check out of the way, Indy started butting it all back up. He was pretty anxious to get it back together because “hot date” on order for today and he was waiting on my old ass to tinker through figuring this out so he could get back on the highway (The older I get, the more I want modifications to look “factory” or “original”. So it takes me a bit to let my brain walk around the ideas).


Needless to say, the white gauges are what we added to his car. The tachometer (RPM Gauge) was the most intensive, so we made sure it was good first. The bottom two gauges will be done soon, but it’s safe to drive as it is now, and he can see his engine spins accurately. The tach is also friction fit into the upper dash, so if it doesn’t turn out to be right over time, we can easily tweak it a little to get it to sit better, or at a better angle for him. Looks mint currently though, so we’ll wait and see (I’m voting for the 3.5″ RPM gauge to be fit into that spot with a little adapter so it looks “stock’ish” but has the “Performance” look of the 1995 Ford Escort Cosworth).
Unfortunately, the new “Purple” light bulbs are about as purple as 50 year old sun faded pale lavender. If you didn’t know there were Purple bulbs in there, you wouldn’t know there were purple bulbs in there. So pissed, cuz getting to them again to try another type of purple bulb is a beeeotch. The new tach however, DOES have LED lights inside, that are also select-able with the push of a button, so his tach IS purple as a people eater.
For the oil pressure gauge we need to drill another hole in the firewall, find and remove the factory oil sending unit, install a T-Fitting, put the oil sender on the T-Fitting, add the oil line to the T-Fitting, and wire up the light bulb in the gauge to the dash lights so they’ll dim with the dash lights.
For the water temperature gauge, well need to drill an egregiously large hole in the firewall (It is a mechanical gauge, so it has a hard-line with about a 14mm nut that has to go through the firewall), find and “edit” the hot water sending unit (if the thermostat is near the location, I’ll put a new one in), wire up the bulb inside with the Oil Pressure gauge bulb, and call it a day. Could be a couple hours, could be a weekend, we’ll see how many bolts snap off, leaks develop, and issues are found in the process (I expect some, but not a plethora).
His car also has bad “Automatic Seat-belts” so I ordered both sides to replace, and that’ll be a learning curve because I ain’t never worked on nothin’ quirky like that before, ever. They’re the kind that move to the front of the door when you shut the car off, and motorize back to where a normal shoulder belt would be when the key is on. Quirky, a little fun sometimes, but a hassle to repair, not really safe when they’re broken, and difficult to find replacement parts when they do break, and they don’t make the parts anymore, so you’re getting old used stuff out of Canada usually.
Hopefully Indy will keep taking pride, and enjoyment in working on his hooptie. It is a lot of fun when he’s as interested in working on it as I am.
My Crown Vic still needs two of its gauges finished, my steering wheel buttons programmed for the radio, and my cruise control wiring needs a tweak. I also bought new headlights (stock) to replace the fancy and expensive aftermarket lights I’ve been using (so dim) and new wheel well trim I need to install. Indy has mentioned getting started on that, so maybe that’ll be a fall project before it gets too cold to work comfortably.
His car has a mysterious antifreeze leak somewhere, so we’ll be keeping an eye on that for a while. Until then, I made sure he got a fresh gallon of antifreeze, and knows to keep an eye on it. The way it goes down, I’m of the opinion it is probably a slow leak hose, crack in the reservoir, or something similar. Even if it is a head gasket, that is a day job to fix once the parts are here.


Hey there, about 2 years later to the day, I stepped up on your post while searching the internet for data on how to hook up an aftermarket tachometer in an LX wagon Circa 1995. The one we just bought my son who’s 15 going on 16 (or 21 depending on the day and is attitude), had a tachometer added in the same spot yours is. Non-functional when we bought the car about 2 months ago, I took the time yesterday to rip apart the dash and trace the
wiring Found that the power and ground and Lighting was landed with the signal wire unlanded, looking like it never had been. Any tips you can give me on where it should go? Appreciate it very much
Hello there, this may be my second posted comment, not sure what happened to the first one written a few days ago but it doesn’t appear here. I’m in the middle of resurrecting a tachometer mounted in the same location as yours is on my son’s 1995 Ford Escort wagon. We found that the green post input wire was unlanded, and wondering if you had some direction for us on how you got yours to work? Any help would be much appreciated we’re going to pick this up again this weekend and resume the head scratching
Hay there, really sorry it took a hot minute to approve and reply to your post.
If it uses the EDIS module, connect the signal wire to the internal contact on the EDIS module, which is also the yellow with a dark blue stripe. The tachometer’s red wire connects to a switched +12-volt power source, the black wire to a ground, and the white (optional) wire to the dimmer circuit for the dash lights.
For my son’s I spliced the wire into his EDIS module (I “think” it is the 2nd wire from the left, but you can search the FEOA.net forums. I don’t have time right not to search it much, and I’m up in Idaho so I can’t go look at his car to see where I spliced in (which pin).
Thanks for making a comment, I appreciate it.
Hello again Justin and thank you so much for taking the time to reply, I did have a look and found the edis4 module close to the battery, strange thing is it had a yellow with blue stripe lead coming off of the factory plug, about 6 in long, and sourced from the second pin from the left as you’re looking down at it, I tried connecting that lead to the green wire on the tack, but didn’t get a reading, although the engine was running. I may have mentioned before, but I’m certain of the other wires from this tach power, ground, lighting, etc. I’ll try to attach a photo, any other info would be awesome, I’m not sure the existing is even functional, so I may go purchase one so as to start with a known good meter
It’s been a handful of years, but I think I ordered it from Amazon. It is a “Glowshift” tachometer. Starting with something you know is good might be the ticket. It sounds like the previous owner may have just thrown it together to sell it (I’m working on a “63 Fairlane that is in that type of condition – tossed together to sell).
success! the 40.00 Amazon sourced tach arrived, and within hours it was wired up and reading the wagon’s revs…thanks for the help, yeah the existing tach pulse lead was not landed, and didn’t work even when that wire was connected. New tach wired exactly the same as the old, and works just fine. efis module lead yellow with dark blue tracer (2nd from left) provides the pulse. Long live the ‘scort wagon!